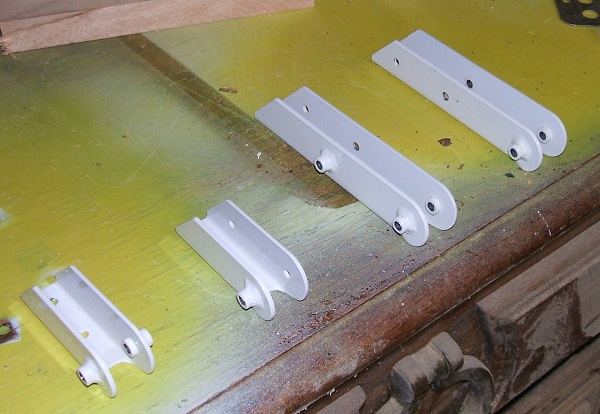
Ok, so after cutting and bending the brackets, I drilled them for the 5/16" x .065 tubing. I cut the tubing on the lathe using a parting bit, each section being 1.10 in length. This allows for the tubing to span the 5/8" inside dimension of the brackets, and protrude 5/16" fromt he inside edge of the .071 material the bracket is made from. I then postion the tubing and weld it on.
Welding...TIG....I used a 3/32 - 2% thorated tungsten (red band), #6 cup, and the 60amp setting, with 15c on the argon flow meter. I used a .045 rod, as the next size up was slightly too thick for the amp setting I was using. I got sufficient penetration without using all the pedal, but came real close....so 55 amps would probably be better.
Anyway, here's the result. Now, the tubing is not crooked, but it sure appears that way........hey, I ain't no photographer.

After the welding, you then put in drill press and ream to size....in this case, 3/16.
You then cut out a portion of the center of the bushing to the correct dimension to fit the Fafnir rod end. Randy prefers to size it so that the rod end and two large washers will fit int he gap. I agree with him, but it's your choice.
SOme of the brackets have the bushing welded to the surface and do not go through the bracket material. Pay attention to Beej's pics at the bottom of the page to see which ones...cut those bushing in the lathe to .2415, or about 1/4 inch if you're not using a lathe.
When you're done, you have what appears to be a very nice bracket, just like the expensive store-bought ones.
It cost me about $12 for the .071 4130 steel plate, about $2.50 for the tubing, and about 10 hrs total time to make these. I know Steen gets about $300 for a set...maybe less. Point is, with a little patience and some time, you can make these and be proud of them when you're done.
Below is my brackets, without final paint finish....

ANd here are the store bought ones, courtesy of Beej....

If you want to make your own, be careful ont he "handed" items...right side, left side, etc...
Now I can use these as a template to drill the aileron spars...on to building my ailerons!!!Edited by: scottly
Welding...TIG....I used a 3/32 - 2% thorated tungsten (red band), #6 cup, and the 60amp setting, with 15c on the argon flow meter. I used a .045 rod, as the next size up was slightly too thick for the amp setting I was using. I got sufficient penetration without using all the pedal, but came real close....so 55 amps would probably be better.
Anyway, here's the result. Now, the tubing is not crooked, but it sure appears that way........hey, I ain't no photographer.
After the welding, you then put in drill press and ream to size....in this case, 3/16.
You then cut out a portion of the center of the bushing to the correct dimension to fit the Fafnir rod end. Randy prefers to size it so that the rod end and two large washers will fit int he gap. I agree with him, but it's your choice.
SOme of the brackets have the bushing welded to the surface and do not go through the bracket material. Pay attention to Beej's pics at the bottom of the page to see which ones...cut those bushing in the lathe to .2415, or about 1/4 inch if you're not using a lathe.
When you're done, you have what appears to be a very nice bracket, just like the expensive store-bought ones.
It cost me about $12 for the .071 4130 steel plate, about $2.50 for the tubing, and about 10 hrs total time to make these. I know Steen gets about $300 for a set...maybe less. Point is, with a little patience and some time, you can make these and be proud of them when you're done.
Below is my brackets, without final paint finish....
ANd here are the store bought ones, courtesy of Beej....

If you want to make your own, be careful ont he "handed" items...right side, left side, etc...
Now I can use these as a template to drill the aileron spars...on to building my ailerons!!!Edited by: scottly


