


Bernie
Well-Known Member
- Joined
- Jan 28, 2008
- Messages
- 113
- Reaction score
- 1
Making fiberglass fairings without permanent molds.
I don't have photos of fabricating all the fairings on my airplane so I'll describe the process with what's available since they all follow a similar approach.
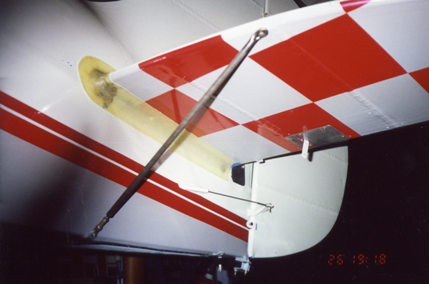
First step is to apply some kind of release protection to the airframe so that the epoxy doesn't permanently stick. This can be done with many things but I normally use packing tape, duct tape, mylar, wax paper or plastic. Carnuba wax or mold release can also be used if you've got them but be careful since they could affect your ability to apply paint later. In this picture the wing and strut have been protected with clear packing tape. Epoxy doesn't stick to it and it comes off easily without taking the paint with it.
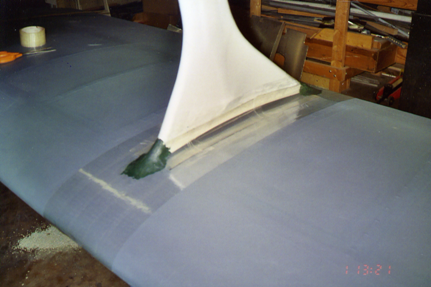
The second step is to form the mold surface. In the previous picture 14 mil mylar was wrapped into the corner between the wing and base of the strut to form the basic shape of the fairing. The mylar was installed in three separate pieces to conform to the shape of the airfoil and packing tape sealed the seams between the three pieces. Packing tape also was also used to hold the myler down to the wing and strut. I used mylar because itâs something I had from molding R/C sailplane wings. (Hard to see in the photo because it's clear.) A long list of other materials could be used such as screen, linoleum, cardboard, plastic sheet, foam...Your imagination can run free on this one. Just apply packing tape on materials that would stick to the epoxy to act as a release film. Modeling clay was used at the front and back to blend those areas of the mold.
In the third step, the glass is layed up on the mold. For these fairings I used four plies of 7781 fiberglass cloth. This is a 9 oz crowfoot weave that conforms nicely to complex contours and is available from Aircraft Spruce. A bidirectional weave would also have worked OK on these particular fairings but the more intricate fairings will lay up easier with crowfoot. I've tried several different epoxies over the years and like West Systems products with the measuring pumps. Those pumps are handy when you're doing a large layup and don't have time to stop and weigh out each batch. (Especially on a hot summer day.) Another note on resins: Polyester resin is quite a bit cheaper than epoxy and is available at hardware stores. It works fine but I donât care for the smell and it shrinks over time which can warp or crack your fairing. Epoxies are also tougher so itâs worth the extra cost.
Stuff youâll need to have on hand:
Epoxy resin
Plastic or non-waxed paper cups to hold the resin
Means for measuring epoxy: Pumps, measuring cups, balance beam or good scale. When not using the pumps I use an electronic postage scale available from office supply stores. Itâs important that the resins be mixed in the proper ratio so it pays to be accurate here. Trust me, a batch that doesnât cure properly is a bummer.
Glass fabric. Cut out all your plies before mixing any epoxy.
Disposable brushes. I prefer the brushes with bare-wood handles and light brown bristles. Theyâre cheap, readily available at hardware stores and donât normally shed bristles. I usually use 1 inch wide brushes but that depends on the size of the layup. I also cut off the bristles leaving approx ¾ inch sticking out. This stiffens the bristles which helps when you âstippleâ the fabric in place.
Tongue depressors or popsicle sticks for mixing the resin.
Disposable gloves
Paper towels for wiping up after yourself.This is a messy job.
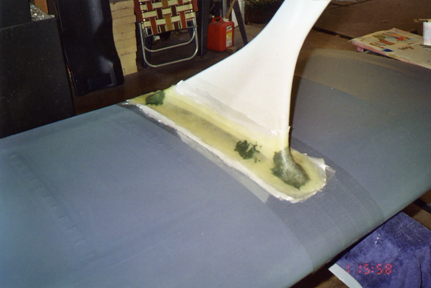
Mix up a batch of epoxy and brush it onto your mold. Layup the first ply of fabric and brush more epoxy through it. Youâll know when its fully saturated since the fabric turns darker and looks wet. If you have any light spots, work the epoxy through the weave with the tip of the brush. This is âstipplingâ. When youâre happy with the first ply lay down the next one and repeat. Avoid having any seams overlay each other between plies. This would create a weak spot in the fairing.
Let the whole thing cure over night.
Step four op the fairing loose from the mold. You may have to slit the fairing if itâs locked onto the part. I slit the I-strut fairings along their trailing edges with a thin disk cutter on a Dremel tool. That slit also defines where the finished part separates to install on the airplane. Clean the mold materials off the airplane and fairing.

Step five: Trim the edges of the fairing. Sand and fill; repeat until youâre happy with the finish. There are a number of decent fillers available. One that I like is âRage Goldâ by Evercoat and itâs available from auto paint supply stores. The material is light in weight and sands nicely. Avoid polyester fillers, like Bondo, since they shrink and crack over time. Temporarily install the part on the airplane to get the fastening scheme worked out. For small fairings, #6 screws work well. Larger fairings may need #8s. The I-strut fairings shown used one 6-32 screw at the front and two at the back (one on each side of the slit). Brass nutserts, available from hobby shops, were epoxied into the wing for these fairing screws to thread into. Nutplates are used when the fairing is attached to metal skins.
Paint with a decent fill primer then sand working up to 400 grit paper. It usually takes me about four primer coats before Iâm happy with the results. Ask your paint supplier what filler they recommend to verify it works with the system youâre going to use. Paint the top coats on the part. Consider bonding a rubber extrusion along the edge of the fairing if it rides on fabric to avoid abrasion.
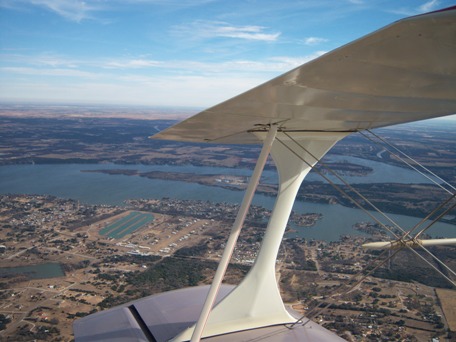
The finished I strut fairings.
Horizontal tail fairings were fabricated just like the I-strut fairings.
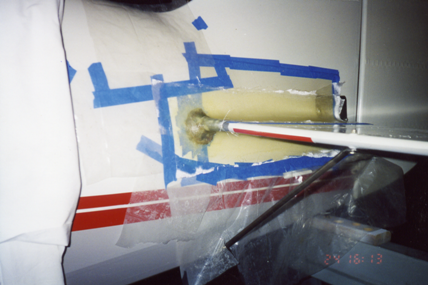
Cabane fairings were also handled the same way except each mold was entirely formed of modeling clay. A good place to pick up a block of oil-based clay is from an art supply store. The clay forms nicely and can be smoothed out with your fingers. It doesnât harden and you can use it over and over on future parts. Just store it in a plastic bag.
The main landing gear and wing root fairings were made in a similar manner but used gutter screen for forming the mold. Itâs cheap and molds easily into convenient shapes.

Aluminum tape was applied to the screen to seal the grid - and it sticks tenaciously. Donât stick it to anything youâd like to remove it from.

For these larger fairings use 6 plies of fabric.

Permanent molds could be pulled off the finished fairings but since no two plans-built airplanes are alike they may not fit well. I took a lot of liberties with the external lines of the fuselage so thatâs especially true of this bird. The process does take more time, aluminum strip fairings are quicker to fabricate, but I like how a blended set of glass fairings dresses up the lines of an airplane.
I don't have photos of fabricating all the fairings on my airplane so I'll describe the process with what's available since they all follow a similar approach.
First step is to apply some kind of release protection to the airframe so that the epoxy doesn't permanently stick. This can be done with many things but I normally use packing tape, duct tape, mylar, wax paper or plastic. Carnuba wax or mold release can also be used if you've got them but be careful since they could affect your ability to apply paint later. In this picture the wing and strut have been protected with clear packing tape. Epoxy doesn't stick to it and it comes off easily without taking the paint with it.
The second step is to form the mold surface. In the previous picture 14 mil mylar was wrapped into the corner between the wing and base of the strut to form the basic shape of the fairing. The mylar was installed in three separate pieces to conform to the shape of the airfoil and packing tape sealed the seams between the three pieces. Packing tape also was also used to hold the myler down to the wing and strut. I used mylar because itâs something I had from molding R/C sailplane wings. (Hard to see in the photo because it's clear.) A long list of other materials could be used such as screen, linoleum, cardboard, plastic sheet, foam...Your imagination can run free on this one. Just apply packing tape on materials that would stick to the epoxy to act as a release film. Modeling clay was used at the front and back to blend those areas of the mold.
In the third step, the glass is layed up on the mold. For these fairings I used four plies of 7781 fiberglass cloth. This is a 9 oz crowfoot weave that conforms nicely to complex contours and is available from Aircraft Spruce. A bidirectional weave would also have worked OK on these particular fairings but the more intricate fairings will lay up easier with crowfoot. I've tried several different epoxies over the years and like West Systems products with the measuring pumps. Those pumps are handy when you're doing a large layup and don't have time to stop and weigh out each batch. (Especially on a hot summer day.) Another note on resins: Polyester resin is quite a bit cheaper than epoxy and is available at hardware stores. It works fine but I donât care for the smell and it shrinks over time which can warp or crack your fairing. Epoxies are also tougher so itâs worth the extra cost.
Stuff youâll need to have on hand:
Epoxy resin
Plastic or non-waxed paper cups to hold the resin
Means for measuring epoxy: Pumps, measuring cups, balance beam or good scale. When not using the pumps I use an electronic postage scale available from office supply stores. Itâs important that the resins be mixed in the proper ratio so it pays to be accurate here. Trust me, a batch that doesnât cure properly is a bummer.
Glass fabric. Cut out all your plies before mixing any epoxy.
Disposable brushes. I prefer the brushes with bare-wood handles and light brown bristles. Theyâre cheap, readily available at hardware stores and donât normally shed bristles. I usually use 1 inch wide brushes but that depends on the size of the layup. I also cut off the bristles leaving approx ¾ inch sticking out. This stiffens the bristles which helps when you âstippleâ the fabric in place.
Tongue depressors or popsicle sticks for mixing the resin.
Disposable gloves
Paper towels for wiping up after yourself.This is a messy job.
Mix up a batch of epoxy and brush it onto your mold. Layup the first ply of fabric and brush more epoxy through it. Youâll know when its fully saturated since the fabric turns darker and looks wet. If you have any light spots, work the epoxy through the weave with the tip of the brush. This is âstipplingâ. When youâre happy with the first ply lay down the next one and repeat. Avoid having any seams overlay each other between plies. This would create a weak spot in the fairing.
Let the whole thing cure over night.
Step four
op the fairing loose from the mold. You may have to slit the fairing if itâs locked onto the part. I slit the I-strut fairings along their trailing edges with a thin disk cutter on a Dremel tool. That slit also defines where the finished part separates to install on the airplane. Clean the mold materials off the airplane and fairing.
Step five: Trim the edges of the fairing. Sand and fill; repeat until youâre happy with the finish. There are a number of decent fillers available. One that I like is âRage Goldâ by Evercoat and itâs available from auto paint supply stores. The material is light in weight and sands nicely. Avoid polyester fillers, like Bondo, since they shrink and crack over time. Temporarily install the part on the airplane to get the fastening scheme worked out. For small fairings, #6 screws work well. Larger fairings may need #8s. The I-strut fairings shown used one 6-32 screw at the front and two at the back (one on each side of the slit). Brass nutserts, available from hobby shops, were epoxied into the wing for these fairing screws to thread into. Nutplates are used when the fairing is attached to metal skins.
Paint with a decent fill primer then sand working up to 400 grit paper. It usually takes me about four primer coats before Iâm happy with the results. Ask your paint supplier what filler they recommend to verify it works with the system youâre going to use. Paint the top coats on the part. Consider bonding a rubber extrusion along the edge of the fairing if it rides on fabric to avoid abrasion.
The finished I strut fairings.
Horizontal tail fairings were fabricated just like the I-strut fairings.
Cabane fairings were also handled the same way except each mold was entirely formed of modeling clay. A good place to pick up a block of oil-based clay is from an art supply store. The clay forms nicely and can be smoothed out with your fingers. It doesnât harden and you can use it over and over on future parts. Just store it in a plastic bag.
The main landing gear and wing root fairings were made in a similar manner but used gutter screen for forming the mold. Itâs cheap and molds easily into convenient shapes.
Aluminum tape was applied to the screen to seal the grid - and it sticks tenaciously. Donât stick it to anything youâd like to remove it from.
For these larger fairings use 6 plies of fabric.
Permanent molds could be pulled off the finished fairings but since no two plans-built airplanes are alike they may not fit well. I took a lot of liberties with the external lines of the fuselage so thatâs especially true of this bird. The process does take more time, aluminum strip fairings are quicker to fabricate, but I like how a blended set of glass fairings dresses up the lines of an airplane.