Here is my latest update from my blog. Text in italics is essentially a repeat of another thread on here, so ignore it if you wish.

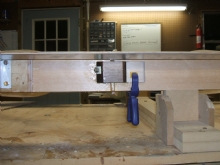
<TD vAlign=top>Pic showing ply 'ear', note taller block
I noticed my drag wires at one station became slightly slack. So the alarm bells started ringing in my head. Sure enough, a drag block had failed. I couldn't find the test piece that I had 'stored' away! I loosened all the wires and proceeded to give all the blocks a good wack with a 5/8 socket and hammer to see for movement. All seemed ok. But it was haunting me, so I have parred them all off with my best chisel....better safe than dead.
Imade thenew blocks a little taller [1" 7/8]for more surface area to glue to. It may not be needed, but it made me feel better.
This is my normal procedure for glue-up: vacuum the surfaces, blow them, wipe with acetone, apply glue to both surfaces, let sit for 5 mins, then clamp lightly.
Lesson learned: keep your test pieces labeled and in a bucket somewhere, and test them at the right time.
How did I know it failed? Basically, when tightening up the drag nut, the block moved, but it didn't move immediately, it moved over a 2/3 day period.
The rogue block was from the same glue batch as the others, yet the others it seems were fine, but you cannot really tell until you start chiselling down, then of course, you are committed in changing.
Things to look out for:
good glue procedure
test the test piece before fitting the wires
wires dont need much tensioning
dont tension wires until the t-88 has cured for a few days...it gets stronger over time.
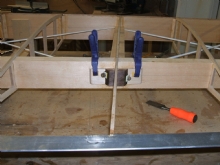
As can be seen from the pics, I also added some ply 'ears' adjacent to the blocks. This provides even more glue surface area.
All this really set me back. I had to trashall my original tramellingsetup, remove the wires,remake the blocks, glue back on, re-drill the blocks [I back-drilled via the existing holes in the spar], and finally re-trammel everything.
I think I may found the cause of my failed join:
While making my new drag blocks: I was getting ready to cut the rib-dado in the blocks with a cross-cut sled on my table saw, and I reached for the silicone spray for lubricating the table. I don't often use it [mostly for cross-cutting], I usually rub it in with a cloth, and never had a problem with it affecting finishes or glues, but I got to thinking...what if the original block material had been exposed to silicone when I sprayed the table? What if t-88 doesn't like silcone, period? For all I recall the wood may have been on the edge of the table saw when I sprayed..so..my primitive results:
test pieces, all same glue batch:
-no silicone on table: positive result
-silicone on table, but worked-in with cloth: positive result
-silicone sprayed on wood replicating the over-spray scenario: partial failure - approx 25% of the join failed to mate.
I know this isn't conclusive, but it possibly told me enough that I didnt need to be using silicone and that I may have found the source of my join failure.
Wing Tip
Now I am back on track. Where was I? Oh yeah...I was starting to tidy-up the tip bow area before I was side-tracked with the above...
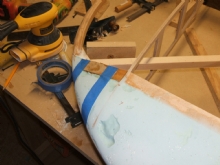
The foam is now fitted, superfil layered on, and roughly sanded to shape. I will add the final layer of superfil when the LE ply is set. I had taken a little too much off the front spar tip when tapering down, so I laminated a 1/16 piece in there [see pic], which I will plane back down slightly.
Gussetts
I also decided to add corner gussetts to the ribs at the inner bay. This process really is a pain, what with a lot of fiddly pieces to glue-in and cutting the material for the correct angle [6.5 deg]etc. The best way I found to clamp these gussets, was by inserting a long stick of scrap lumber1/4 x 1/4 x the length of the bay at the opposite corner + 1/8, set the gusset, then slightly bend the stick as you coherce it into position thus holding the gusset in place under light tension.
Ailerons
Both ailerons are now complete and fitted / aligned [tip:use a plumb line]. Setting these ailerons actually took as long as building the wing thus far. :0|
I have toadd corner gussets to the right wing, then I can finally turn over the wings, and start adding the spar fillers and focus on cloaking the curved aileron wells.
Note: I have realized that it is wise not to splice the two wings together until you really have to...much easier to work with.

Gussets in background and clamping the 'ears'...

Glueing a laminate to build-up...

<TD vAlign=top>Pic showing ply 'ear', note taller block
I noticed my drag wires at one station became slightly slack. So the alarm bells started ringing in my head. Sure enough, a drag block had failed. I couldn't find the test piece that I had 'stored' away! I loosened all the wires and proceeded to give all the blocks a good wack with a 5/8 socket and hammer to see for movement. All seemed ok. But it was haunting me, so I have parred them all off with my best chisel....better safe than dead.
Imade thenew blocks a little taller [1" 7/8]for more surface area to glue to. It may not be needed, but it made me feel better.
This is my normal procedure for glue-up: vacuum the surfaces, blow them, wipe with acetone, apply glue to both surfaces, let sit for 5 mins, then clamp lightly.
Lesson learned: keep your test pieces labeled and in a bucket somewhere, and test them at the right time.
How did I know it failed? Basically, when tightening up the drag nut, the block moved, but it didn't move immediately, it moved over a 2/3 day period.
The rogue block was from the same glue batch as the others, yet the others it seems were fine, but you cannot really tell until you start chiselling down, then of course, you are committed in changing.
Things to look out for:
good glue procedure
test the test piece before fitting the wires
wires dont need much tensioning
dont tension wires until the t-88 has cured for a few days...it gets stronger over time.
As can be seen from the pics, I also added some ply 'ears' adjacent to the blocks. This provides even more glue surface area.
All this really set me back. I had to trashall my original tramellingsetup, remove the wires,remake the blocks, glue back on, re-drill the blocks [I back-drilled via the existing holes in the spar], and finally re-trammel everything.
I think I may found the cause of my failed join:
While making my new drag blocks: I was getting ready to cut the rib-dado in the blocks with a cross-cut sled on my table saw, and I reached for the silicone spray for lubricating the table. I don't often use it [mostly for cross-cutting], I usually rub it in with a cloth, and never had a problem with it affecting finishes or glues, but I got to thinking...what if the original block material had been exposed to silicone when I sprayed the table? What if t-88 doesn't like silcone, period? For all I recall the wood may have been on the edge of the table saw when I sprayed..so..my primitive results:
test pieces, all same glue batch:
-no silicone on table: positive result
-silicone on table, but worked-in with cloth: positive result
-silicone sprayed on wood replicating the over-spray scenario: partial failure - approx 25% of the join failed to mate.
I know this isn't conclusive, but it possibly told me enough that I didnt need to be using silicone and that I may have found the source of my join failure.
Wing Tip
Now I am back on track. Where was I? Oh yeah...I was starting to tidy-up the tip bow area before I was side-tracked with the above...
The foam is now fitted, superfil layered on, and roughly sanded to shape. I will add the final layer of superfil when the LE ply is set. I had taken a little too much off the front spar tip when tapering down, so I laminated a 1/16 piece in there [see pic], which I will plane back down slightly.
Gussetts
I also decided to add corner gussetts to the ribs at the inner bay. This process really is a pain, what with a lot of fiddly pieces to glue-in and cutting the material for the correct angle [6.5 deg]etc. The best way I found to clamp these gussets, was by inserting a long stick of scrap lumber1/4 x 1/4 x the length of the bay at the opposite corner + 1/8, set the gusset, then slightly bend the stick as you coherce it into position thus holding the gusset in place under light tension.
Ailerons
Both ailerons are now complete and fitted / aligned [tip:use a plumb line]. Setting these ailerons actually took as long as building the wing thus far. :0|
I have toadd corner gussets to the right wing, then I can finally turn over the wings, and start adding the spar fillers and focus on cloaking the curved aileron wells.
Note: I have realized that it is wise not to splice the two wings together until you really have to...much easier to work with.

Gussets in background and clamping the 'ears'...

Glueing a laminate to build-up...


